一、Container容器组件:
demo1:
import 'package:flutter/material.dart';
void main() {
runApp(MaterialApp(
home: Scaffold(
appBar: AppBar(title: const Text("你好Flutter")),
body: const MyApp(),
),
));
}
// 容器组件
class MyApp extends StatelessWidget {
const MyApp({Key? key}) : super(key: key);
@override
Widget build(BuildContext context) {
return Center(
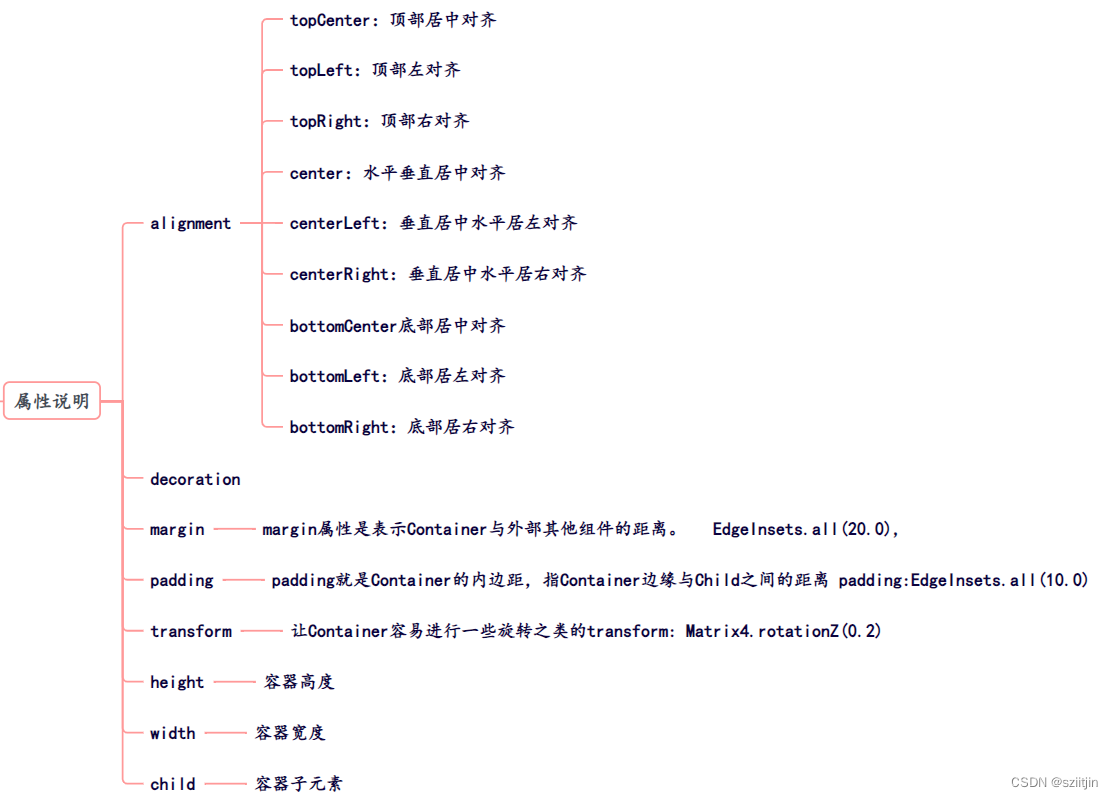
child: Container(
alignment: Alignment.center,
height: 200,
width: 200,
decoration: const BoxDecoration(
color: Colors.yellow,
),
child: const Text(
"你好Flutter",
style: TextStyle(fontSize: 20),
),
),
);
}
}
demo2:
//代码块 importM
import 'package:flutter/material.dart';

void main() {
  runApp(MaterialApp(
    home: Scaffold(
      appBar: AppBar(title: const Text("你好Flutter")),
      body: const MyApp(),
    ),
  ));
}

// 代码块  statelessW
class MyApp extends StatelessWidget {
  const MyApp({Key? key}) : super(key: key);
  @override
  Widget build(BuildContext context) {
    return Center(
      child: Container(
        alignment: Alignment.center,
        height: 200,
        width: 200,
        decoration:  BoxDecoration(
            color: Colors.yellow,
            gradient: const LinearGradient(
              //LinearGradient 背景线性渐变   RadialGradient径向渐变
              colors: [Colors.red, Colors.orange],
            ),
            boxShadow:const [
              //卡片阴影
              BoxShadow(
                color: Colors.blue,
                offset: Offset(2.0, 2.0),
                blurRadius: 10.0,
              )
            ],
            border: Border.all(
                color: Colors.black,
                width: 1
            )
        ),
        transform:Matrix4.rotationZ(0.2),
        child: const Text(
          "你好Flutter",
          style: TextStyle(fontSize: 20),
        ),

      ),
    );
  }
}
demo3:
//代码块 importM
import 'package:flutter/material.dart';

void main() {
  runApp(MaterialApp(
    home: Scaffold(
      appBar: AppBar(title: const Text("你好Flutter")),
      body: const MyApp(),
    ),
  ));
}

// 代码块  statelessW
class MyApp extends StatelessWidget {
  const MyApp({Key? key}) : super(key: key);
  @override
  Widget build(BuildContext context) {
    return Center(

      // child: Container(
      //   margin: EdgeInsets.all(20.0), //容器外补白
      //   color: Colors.orange,
      //   child: Text("Hello world !"),
      // ),
      // child: Container(
      //   padding: EdgeInsets.all(20.0), //容器内补白
      //   color: Colors.orange,
      //   child: Text("Hello world !"),
      // ),
      child: Container(
        alignment: Alignment.center,
        height: 40,
        width: 200,
        decoration:  BoxDecoration(
            color: Colors.blue,
            borderRadius: BorderRadius.circular(15)
        ),
        child: const Text(
          "按钮",
          style: TextStyle(fontSize: 20),
        ),
      ),
    );
  }
}
二、Text组件详解:

demo1:
//代码块 importM
import 'package:flutter/material.dart';

void main() {
  runApp(MaterialApp(
    home: Scaffold(
      appBar: AppBar(title: const Text("你好Flutter")),
      body: const MyApp(),
    ),
  ));
}

// 代码块  statelessW
class MyApp extends StatelessWidget {
  const MyApp({Key? key}) : super(key: key);

  @override
  Widget build(BuildContext context) {
    return Center(
      child: Container(
        alignment: Alignment.center,
        height: 200,
        width: 200,
        decoration: BoxDecoration(
            color: Colors.yellow,
            gradient: const LinearGradient(
              //LinearGradient 背景线性渐变   RadialGradient径向渐变
              colors: [Colors.red, Colors.orange],
            ),
            boxShadow: const [
              //卡片阴影
              BoxShadow(
                color: Colors.blue,
                offset: Offset(2.0, 2.0),
                blurRadius: 10.0,
              )
            ],
            border: Border.all(color: Colors.black, width: 1)),
        transform: Matrix4.rotationZ(.2),
        child: const Text('各位同学大家好',
            textAlign: TextAlign.left,
            overflow: TextOverflow.ellipsis,
            // overflow:TextOverflow.fade ,
            maxLines: 2,
            textScaleFactor: 1.8,
            style: TextStyle(
                fontSize: 16.0,
                color: Colors.black,
                // color:Color.fromARGB(a, r, g, b)
                fontWeight: FontWeight.w800,
                fontStyle: FontStyle.italic,
                decoration: TextDecoration.lineThrough,
                decorationColor: Colors.white,
                decorationStyle: TextDecorationStyle.dashed,
                letterSpacing: 5.0)),
      ),
    );
  }
}
三、Image图片组件详解:

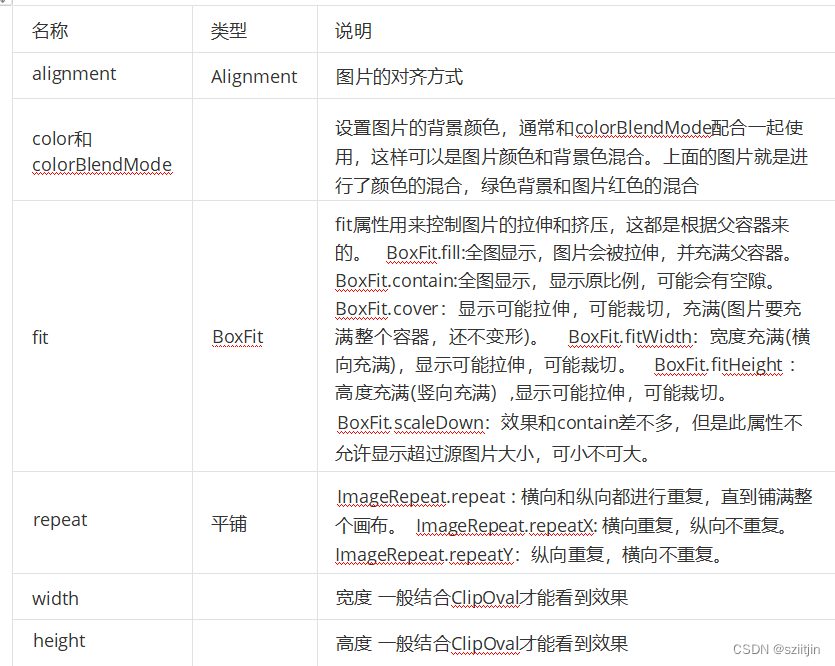
1、加载本地图片
1)项目根目录新建images文件夹,images中新建2.x 3.x对应的文件

2)然后,打开pubspec.yaml 声明一下添加的图片文件,注意:空格

3)使用本地图片
import 'package:flutter/material.dart';

//本地图片
void main() {
  runApp(MaterialApp(
    home: Scaffold(
      appBar: AppBar(title: const Text("你好Flutter")),
      body: const MyApp(),
    ),
  ));
}

class MyApp extends StatelessWidget {
  const MyApp({Key? key}) : super(key: key);
  @override
  Widget build(BuildContext context) {
    return Center(
      child: Image.asset(
          "images/2.jpg",
          width: 150.0,
          height: 150.0,
          fit: BoxFit.cover),
    );
  }
}
2、加载远程图片
import 'package:flutter/material.dart';

//图片路径 https://pics6.baidu.com/feed/43a7d933c895d1431790def92fe644055baf0727.jpeg@f_auto?token=18bdda8ca14969d4351c53a482c2b2ca&s=5BB105C154B1499472A1215B03001013
//远程图片
void main(){
  runApp(
      MaterialApp(
        home: Scaffold(
            appBar: AppBar(title: const Text("你好Flutter")),
            body: const MyApp()
        ),
      )
  );
}
class MyApp extends StatelessWidget {
  const MyApp({Key? key}) : super(key: key);
  @override
  Widget build(BuildContext context) {
    return Center(
      child: Image.network(
          "https://pics2.baidu.com/feed/b7003af33a87e9502b64d86f4c2e9544fbf2b45b.jpeg@f_auto?token=8c6557279177a75d44029840f0db0daa&s=C8AA67D91C0090457095310903005057",
          // "https://pics6.baidu.com/feed/43a7d933c895d1431790def92fe644055baf0727.jpeg@f_auto?token=18bdda8ca14969d4351c53a482c2b2ca&s=5BB105C154B1499472A1215B03001013",
          width: 150.0,
          height: 150.0,
          fit: BoxFit.cover),
    );
  }
}
3、加载圆形图片
1)Container实现圆形图片;
2)ClipOval实现圆形图片;
3)CircleAvatar实现圆形图片。
import 'package:flutter/material.dart';


void main() {
  runApp(MaterialApp(
    home: Scaffold(
        appBar: AppBar(title: const Text("你好Flutter")),
        // body: const MyApp()
        // body: const MyApp2()
        body: const MyApp3()
    ),
  ));
}

const String URL = "https://pics2.baidu.com/feed/b7003af33a87e9502b64d86f4c2e9544fbf2b45b.jpeg@f_auto?token=8c6557279177a75d44029840f0db0daa&s=C8AA67D91C0090457095310903005057";

//Container实现圆形图片
class MyApp extends StatelessWidget {
  const MyApp({Key? key}) : super(key: key);

  @override
  Widget build(BuildContext context) {
    return Center(
      child: Container(
        width: 150,
        height: 150,
        decoration: BoxDecoration(
            color: Colors.yellow,
            borderRadius: BorderRadius.circular(75),
            image: const DecorationImage(
                image: NetworkImage(URL),
                fit: BoxFit.cover)),
      ),
    );
  }
}

//ClipOval实现圆形图片
class MyApp2 extends StatelessWidget {
  const MyApp2({Key? key}) : super(key: key);
  @override
  Widget build(BuildContext context) {
    return Center(
      child: ClipOval(
        child: Image.network(
            URL,
            width: 150.0,
            height: 150.0,
            fit: BoxFit.cover),
      ),
    );
  }
}
//CircleAvatar实现圆形图片
class MyApp3 extends StatelessWidget {
  const MyApp3({Key? key}) : super(key: key);
  @override
  Widget build(BuildContext context) {
    return const CircleAvatar(
        radius: 110,
        backgroundColor: Color(0xffFDCF09),
        child: CircleAvatar(
          radius: 100,
          backgroundImage:
          NetworkImage(URL),
        )
    );
  }
}
四、Icon图标组件:
1、使用Flutter官方lcons图标:
Material Design所有图标可以在其官网查看:——https://material. io/tools/icons/
import 'package:flutter/material.dart';

//使用Flutter官方Icons图标
//图标库:https://material.io/tools/icons/
void main() {
  runApp(MaterialApp(
    home: Scaffold(
      appBar: AppBar(title: const Text("你好Flutter")),
      body: const MyApp(),
    ),
  ));
}


class MyApp extends StatelessWidget {
  const MyApp({Key? key}) : super(key: key);
  @override
  Widget build(BuildContext context) {
    return Center(
        child: Column(
          children: const [
            Icon(Icons.search,color: Colors.red),
            Icon(Icons.home,color: Colors.cyan),
            Icon(Icons.category),
            Icon(Icons.shop),
          ]
        )
    );
  }
}
2、Flutter中借助阿里巴巴图标库自定义字体图标 :
1)我们也可以使用自定义字体图标。阿里巴巴图标库官网iconfont.cn上有很多字体图标素材,我们可以选择自己需要的图标打包下载后,会生成一些不同格式的字体文件,在Flutter中,我们使用ttf格式即可。
2)假设我们项目中需要使用一个书籍图标和微信图标,我们打包下载后导入:
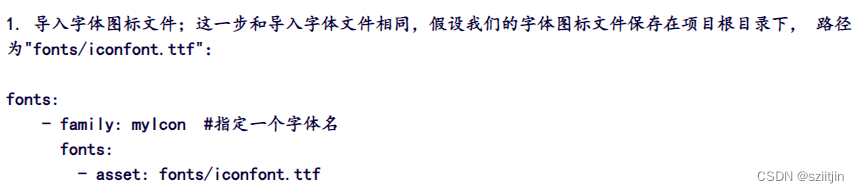
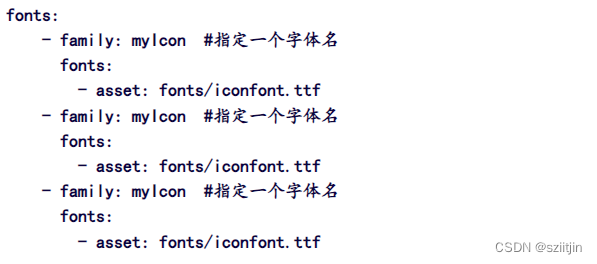
3)也可以在pubspec.yaml配置多个字体文件:
4)为了使用方便,我们定义一个Mylcons类,功能和lcons类一样:将字体文件中的所有图标都定义成静态变量:
import 'package:flutter/material.dart';

class MyIcons{
  // 设置图标
  static const IconData set = IconData(
      0xe601,
      fontFamily: 'myIcon',
      matchTextDirection: true
  );
}
5)使用
import 'package:flutter/material.dart';
import 'package:flutter_chaper_01/src/asset/font.dart';

//使用阿里图标库支持
//图标库:https://material.io/tools/icons/
void main() {
  runApp(MaterialApp(
    home: Scaffold(
      appBar: AppBar(title: const Text("你好Flutter")),
      body: const MyApp(),
    ),
  ));
}


class MyApp extends StatelessWidget {
  const MyApp({Key? key}) : super(key: key);
  @override
  Widget build(BuildContext context) {
    return Center(
        child: Column(
          children: const [
            Icon(MyIcons.set,color: Colors.red),
            Icon(Icons.home,color: Colors.cyan),
            Icon(Icons.category),
            Icon(Icons.shop),
          ]
        )
    );
  }
}
五、ListView列表组件:
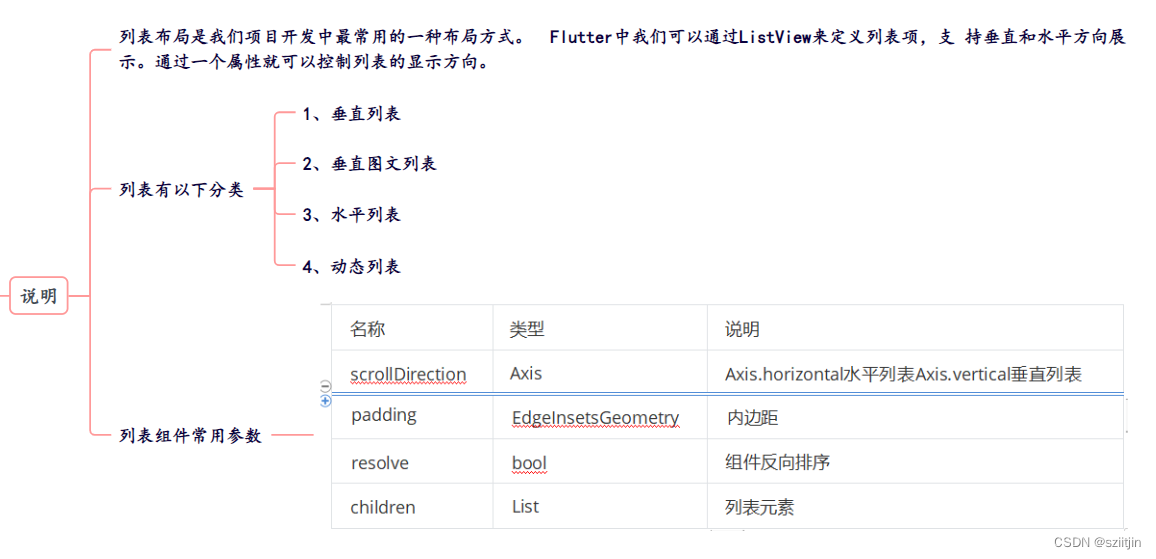
1、垂直列表demo:
import 'package:flutter/material.dart';

void main() {
  runApp(MaterialApp(
    home: Scaffold(
      appBar: AppBar(title: const Text("你好Flutter")),
      // body: const VerticalList(),
      // body: const VerticalIconList(),
      body: const VerticalPicList(),
    ),
  ));
}

//垂直列表
class VerticalList extends StatelessWidget {
  const VerticalList({Key? key}) : super(key: key);

  @override
  Widget build(BuildContext context) {
    return ListView(
      children: const <Widget>[
        ListTile(
          title: Text("我是一个标题"),
        ),
        ListTile(
          title: Text("我是一个标题"),
        ),
        ListTile(
          title: Text("我是一个标题"),
        ),
        ListTile(
          title: Text("我是一个标题"),
        ),
        ListTile(
          title: Text("我是一个标题"),
        ),
        ListTile(
          title: Text("我是一个标题"),
        ),
        ListTile(
          title: Text("我是一个标题"),
        ),
      ],
    );
  }
}

//垂直图标列表
class VerticalIconList extends StatelessWidget {
  const VerticalIconList({Key? key}) : super(key: key);

  @override
  Widget build(BuildContext context) {
    return ListView(
      children: const <Widget>[
        ListTile(
          leading: Icon(Icons.assignment, color: Colors.red),
          title: Text("全部订单"),
        ),
        Divider(),
        ListTile(
          leading: Icon(Icons.payment, color: Colors.green),
          title: Text("待付款"),
        ),
        Divider(),
        ListTile(
          leading: Icon(Icons.local_car_wash, color: Colors.orange),
          title: Text("待收货"),
        ),
        ListTile(
          leading: Icon(Icons.favorite, color: Colors.lightGreen),
          title: Text("我的收藏"),
        ),
        Divider(),
        ListTile(
          leading: Icon(Icons.people, color: Colors.black54),
          title: Text("在线客服"),
        ),
        Divider(),
      ],
    );
  }
}

//垂直图文列表
class VerticalPicList extends StatelessWidget {
  const VerticalPicList({Key? key}) : super(key: key);

  @override
  Widget build(BuildContext context) {
    return ListView(
      children: <Widget>[
        ListTile(
          leading: Image.asset("images/1.png"),
          title: const Text('华北黄淮高温雨今起强势登场'),
          subtitle: const Text("中国天气网讯 21日开始,华北黄淮高温雨今起强势登场"),
        ),
        const Divider(),
        ListTile(
          leading: Image.asset("images/2.png"),
          title: const Text('保监局50天开32罚单 “断供”违规资金为房市降温'),
          subtitle: const Text(
            "中国天气网讯 保监局50天开32罚单 “断供”违规资金为房市降",
          ),
        ),
        const Divider(),
        ListTile(
            title: const Text('华北黄淮高温雨今起强势登场'),
            subtitle: const Text("中国天气网讯 21日开始,华北黄淮高温雨今起强势登场"),
            trailing: Image.asset("images/3.png")),
        const Divider(),
        ListTile(
          leading: Image.asset("images/4.png"),
          title: const Text('普京现身俄海军节阅兵:乘艇检阅军舰'),
        ),
        const Divider(),
        ListTile(
          leading: Image.asset("images/5.png"),
          title: const Text('鸿星尔克捐1个亿帮助困难残疾群体 网友:企业有担当'),
        ),
        const Divider(),
        ListTile(
          leading: Image.asset("images/6.png"),
          title: const Text('行业冥灯?老罗最好祈祷苹果的AR能成'),
        ),
      ],
    );
  }
}
2、水平列表,可以左右滑动demo:
import 'package:flutter/material.dart';

void main() {
  runApp(MaterialApp(
    home: Scaffold(
      appBar: AppBar(title: const Text("你好Flutter")),
      body: const HorizontalList(),
    ),
  ));
}

class HorizontalList extends StatelessWidget {
  const HorizontalList({Key? key}) : super(key: key);

  @override
  Widget build(BuildContext context) {
    return SizedBox(
      height: 180,
      child: ListView(
        scrollDirection: Axis.horizontal,
        children: <Widget>[
          Container(
            width: 180.0,
            color: Colors.red,
          ),
          Container(
            width: 180.0,
            color: Colors.orange,
            child: Column(
              children: <Widget>[
                Image.asset("images/1.png"),
                const Text('我是一个文本')
              ],
            ),
          ),
          Container(
            width: 180.0,
            color: Colors.blue,
          ),
          Container(
            width: 180.0,
            color: Colors.deepOrange,
          ),
          Container(
            width: 180.0,
            color: Colors.deepPurpleAccent,
          ),
        ],
      ),
    );
  }
}
3、ListView动态列表组件,以及循环动态数据demo:
import 'package:flutter/material.dart';

//列表数据动态化
void main() {
  runApp(const MyApp());
}

class MyApp extends StatelessWidget {
  const MyApp({Key? key}) : super(key: key);

// This widget is the root of your application. @override
  @override
  Widget build(BuildContext context) {
    return MaterialApp(
      theme: ThemeData(
        primarySwatch: Colors.yellow,
      ),
      home: Scaffold(
        appBar: AppBar(title: const Text("Flutter ICON")),
        body: const MyHomePage(),
      ),
    );
  }
}

class MyHomePage extends StatelessWidget {
  const MyHomePage({Key? key}) : super(key: key);

  List<Widget> _initListView() {
    List<Widget> list = [];
    for (var i = 0; i < 100; i++) {
      list.add(const ListTile(
        title: Text("我是一个列表"),
      ));
    }
    return list;
  }

  @override
  Widget build(BuildContext context) {
    return ListView(
      children: _initListView(),
    );
  }
}


class MyHomePage2 extends StatelessWidget {
  List list = [];
  MyHomePage2({Key? key}) : super(key: key) {
    for (var i = 0; i < 10; i++) {
      list.add("我是一个列表--$i");
    }
  }
  @override
  Widget build(BuildContext context) {
    return ListView.builder(
        itemCount: list.length,
        itemBuilder: (context, index) {
          return ListTile(
            title: Text("${list[index]}"),
          );
        });
  }
}